 In this guide, you’ll learn how to use Sequin to trigger Trigger.dev tasks from database changes.
Prerequisites
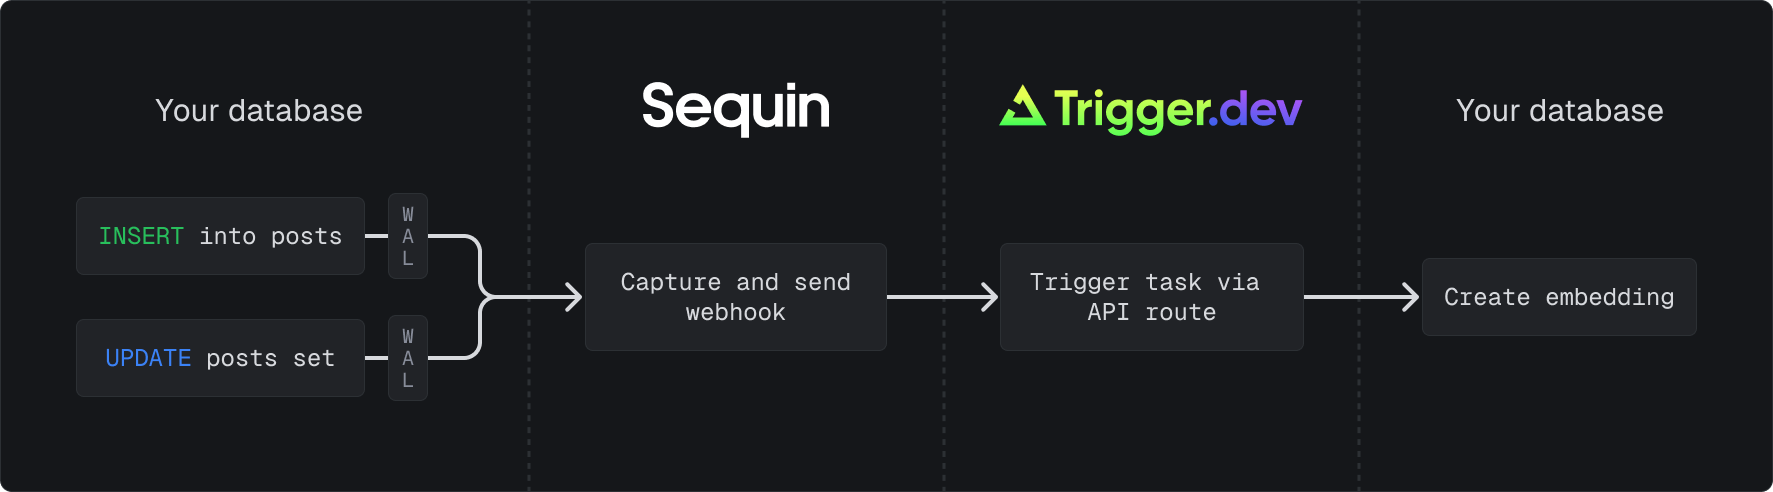
You are about to create a regular Trigger.dev task that you will execute when ever a post is inserted or updated in your database. Sequin will detect all the changes on theposts table and then send the payload of the post to an API endpoint that will call tasks.trigger() to create the embedding and update the database.
As long as you create an HTTP endpoint that Sequin can deliver webhooks to, you can use any web framework or edge function (e.g. Supabase Edge Functions, Vercel Functions, Cloudflare Workers, etc.) to invoke your Trigger.dev task. In this guide, we’ll show you how to setup Trigger.dev tasks using Next.js API Routes.
You’ll need the following to follow this guide:
- A Next.js project with Trigger.dev installed
If you don’t have one already, follow Trigger.dev’s Next.js setup guide to setup your project. You can return to this guide when you’re ready to write your first Trigger.dev task.
- A Sequin account
- A Postgres database (Sequin works with any Postgres database version 12 and up) with a
poststable.
Create a Trigger.dev task
Start by creating a new Trigger.dev task that takes in a Sequin change event as a payload, creates an embedding, and then inserts the embedding into the database:Create a `create-embedding-for-post` task
In your This task takes in a Sequin record event, creates an embedding, and then upserts the embedding into a
src/trigger/tasks directory, create a new file called create-embedding-for-post.ts and add the following code:post_embeddings table.
You’ve successfully created a Trigger.dev task that will create an embedding for each post in your
database. In the next step, you’ll create an API endpoint that Sequin can deliver records to.
Setup API route
You’ll now create an API endpoint that will receive posts from Sequin and then trigger thecreate-embedding-for-post task.
This guide covers how to setup an API endpoint using the Next.js App Router. You can find examples
for Next.js Server Actions and Pages Router in the Trigger.dev
documentation.
Create a route handler
Add a route handler by creating a new This route handler will receive records from Sequin, parse them, and then trigger the
route.ts file in a /app/api/create-embedding-for-post directory:app/api/create-embedding-for-post/route.ts
create-embedding-for-post task.Set secret keys
You’ll need to set four secret keys in a The
.env.local file:SEQUIN_WEBHOOK_SECRET ensures that only Sequin can access your API endpoint.The TRIGGER_SECRET_KEY is used to authenticate requests to Trigger.dev and can be found in the API keys tab of the Trigger.dev dashboard.The OPENAI_API_KEY and DATABASE_URL are used to create an embedding using OpenAI and connect to your database. Be sure to add these as environment variables in Trigger.dev as well.You’ve successfully created an API endpoint that can receive record payloads from Sequin and
trigger a Trigger.dev task. In the next step, you’ll setup Sequin to trigger the endpoint.
Create Sequin consumer
You’ll now configure Sequin to send every row in yourposts table to your Trigger.dev task.
Connect Sequin to your database
- Login to your Sequin account and click the Add New Database button.
- Enter the connection details for your Postgres database.
If you need to connect to a local dev database, flip the use localhost switch and follow the instructions to create a tunnel using the Sequin CLI.
- Follow the instructions to create a publication and a replication slot by running two SQL commands in your database:
- Name your database and click the Connect Database button.
If you need step-by-step connection instructions to connect Sequin to your database, check out our quickstart guide.
Tunnel to your local endpoint
Now, create a tunnel to your local endpoint so Sequin can deliver change payloads to your local API:
- In the Sequin console, open the HTTP Endpoint tab and click the Create HTTP Endpoint button.
- Enter a name for your endpoint (i.e.
local_endpoint) and flip the Use localhost switch. Follow the instructions in the Sequin console to install the Sequin CLI, then run:
- Now, click Add encryption header and set the key to
Authorizationand the value toBearer SEQUIN_WEBHOOK_SECRET. - Click Create HTTP Endpoint.
Create a Push Consumer
Create a push consumer that will capture posts from your database and deliver them to your local endpoint: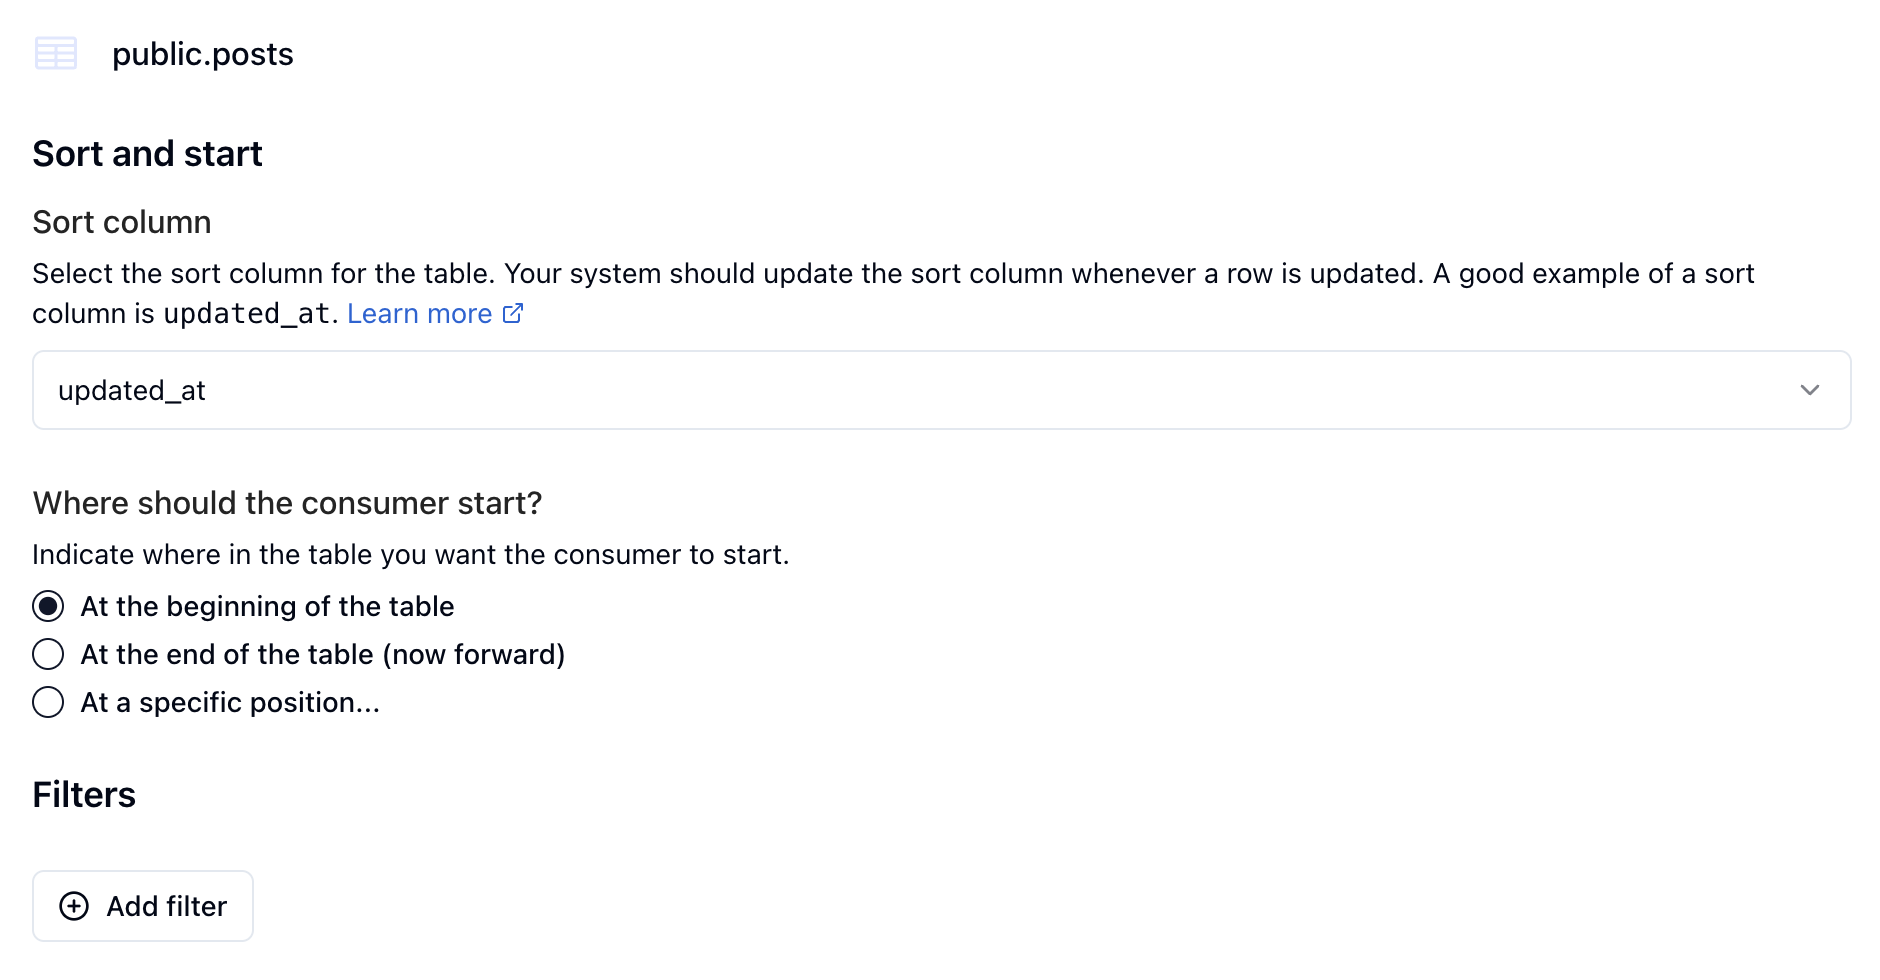
- Navigate to the Consumers tab and click the Create Consumer button.
- Select your
poststable (i.epublic.posts). - You want to ensure that every post receives an embedding - and that embeddings are updated as posts are updated. To do this, select to process Rows and click Continue.
You can also use changes for this particular use case, but rows comes with some nice replay and backfill features.
- You’ll now set the sort and filter for the consumer. For this guide, we’ll sort by
updated_atand start at the beginning of the table. We won’t apply any filters:
- On the next screen, select Push to have Sequin send the events to your webhook URL. Click Continue.
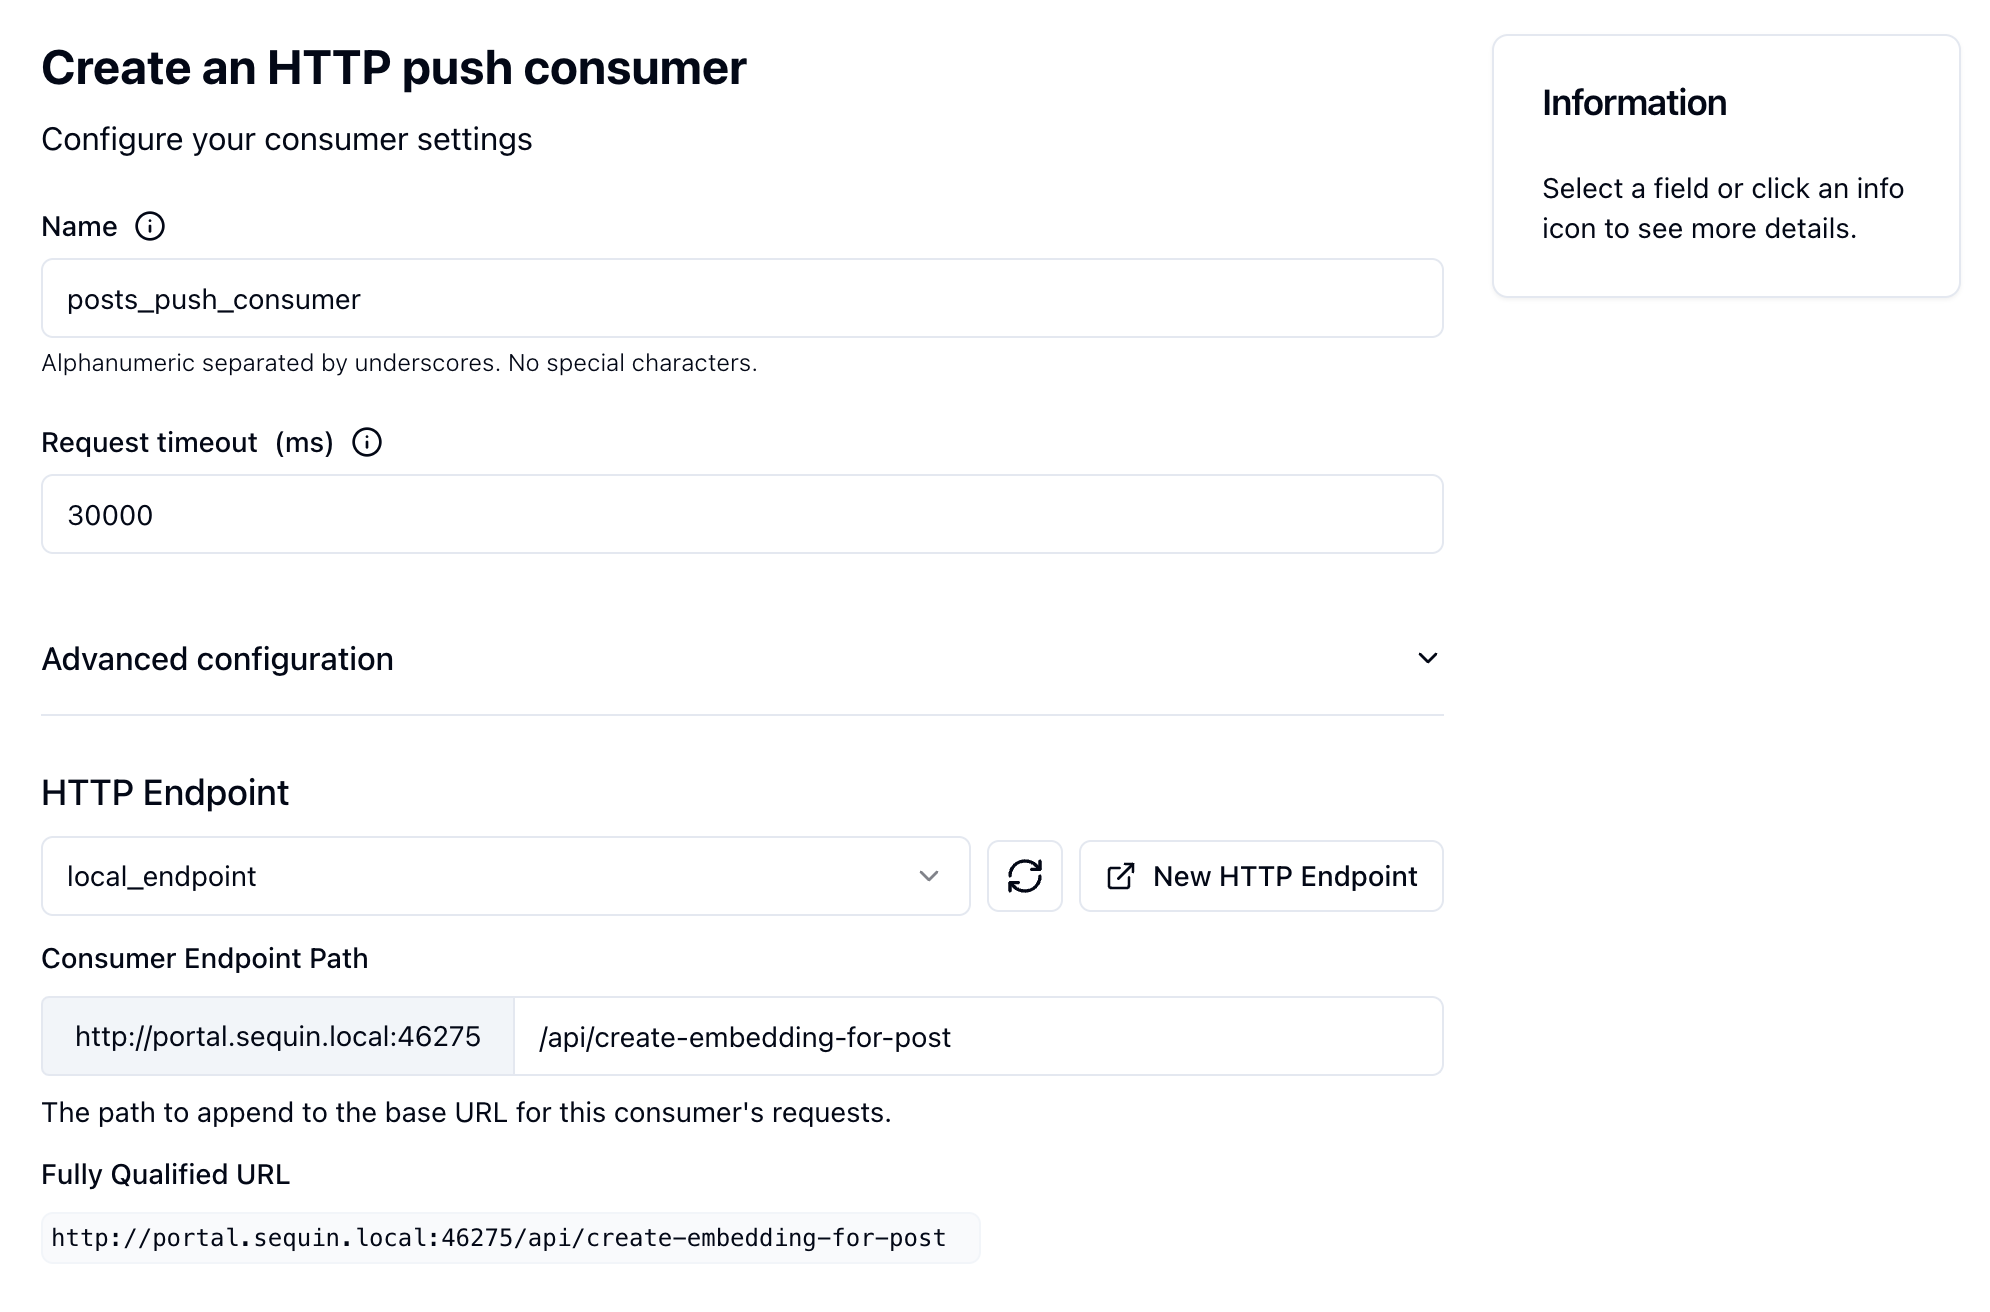
- Now, give your consumer a name (i.e.
posts_push_consumer) and in the HTTP Endpoint section select thelocal_endpointyou created above. Add the exact API route you created in the previous step (i.e./api/create-embedding-for-post):
- Click the Create Consumer button.
Your Sequin consumer is now created and ready to send events to your API endpoint.
Test end-to-end
Spin up you dev environment
- The Next.js app is running:
npm run dev - The Trigger.dev dev server is running
npx trigger.dev@latest dev - The Sequin tunnel is running:
sequin tunnel --ports=3001:local_endpoint
Trace the change in the Sequin dashboard
In the Sequin console, navigate to the Trace tab and confirm that Sequin delivered the event to your local endpoint: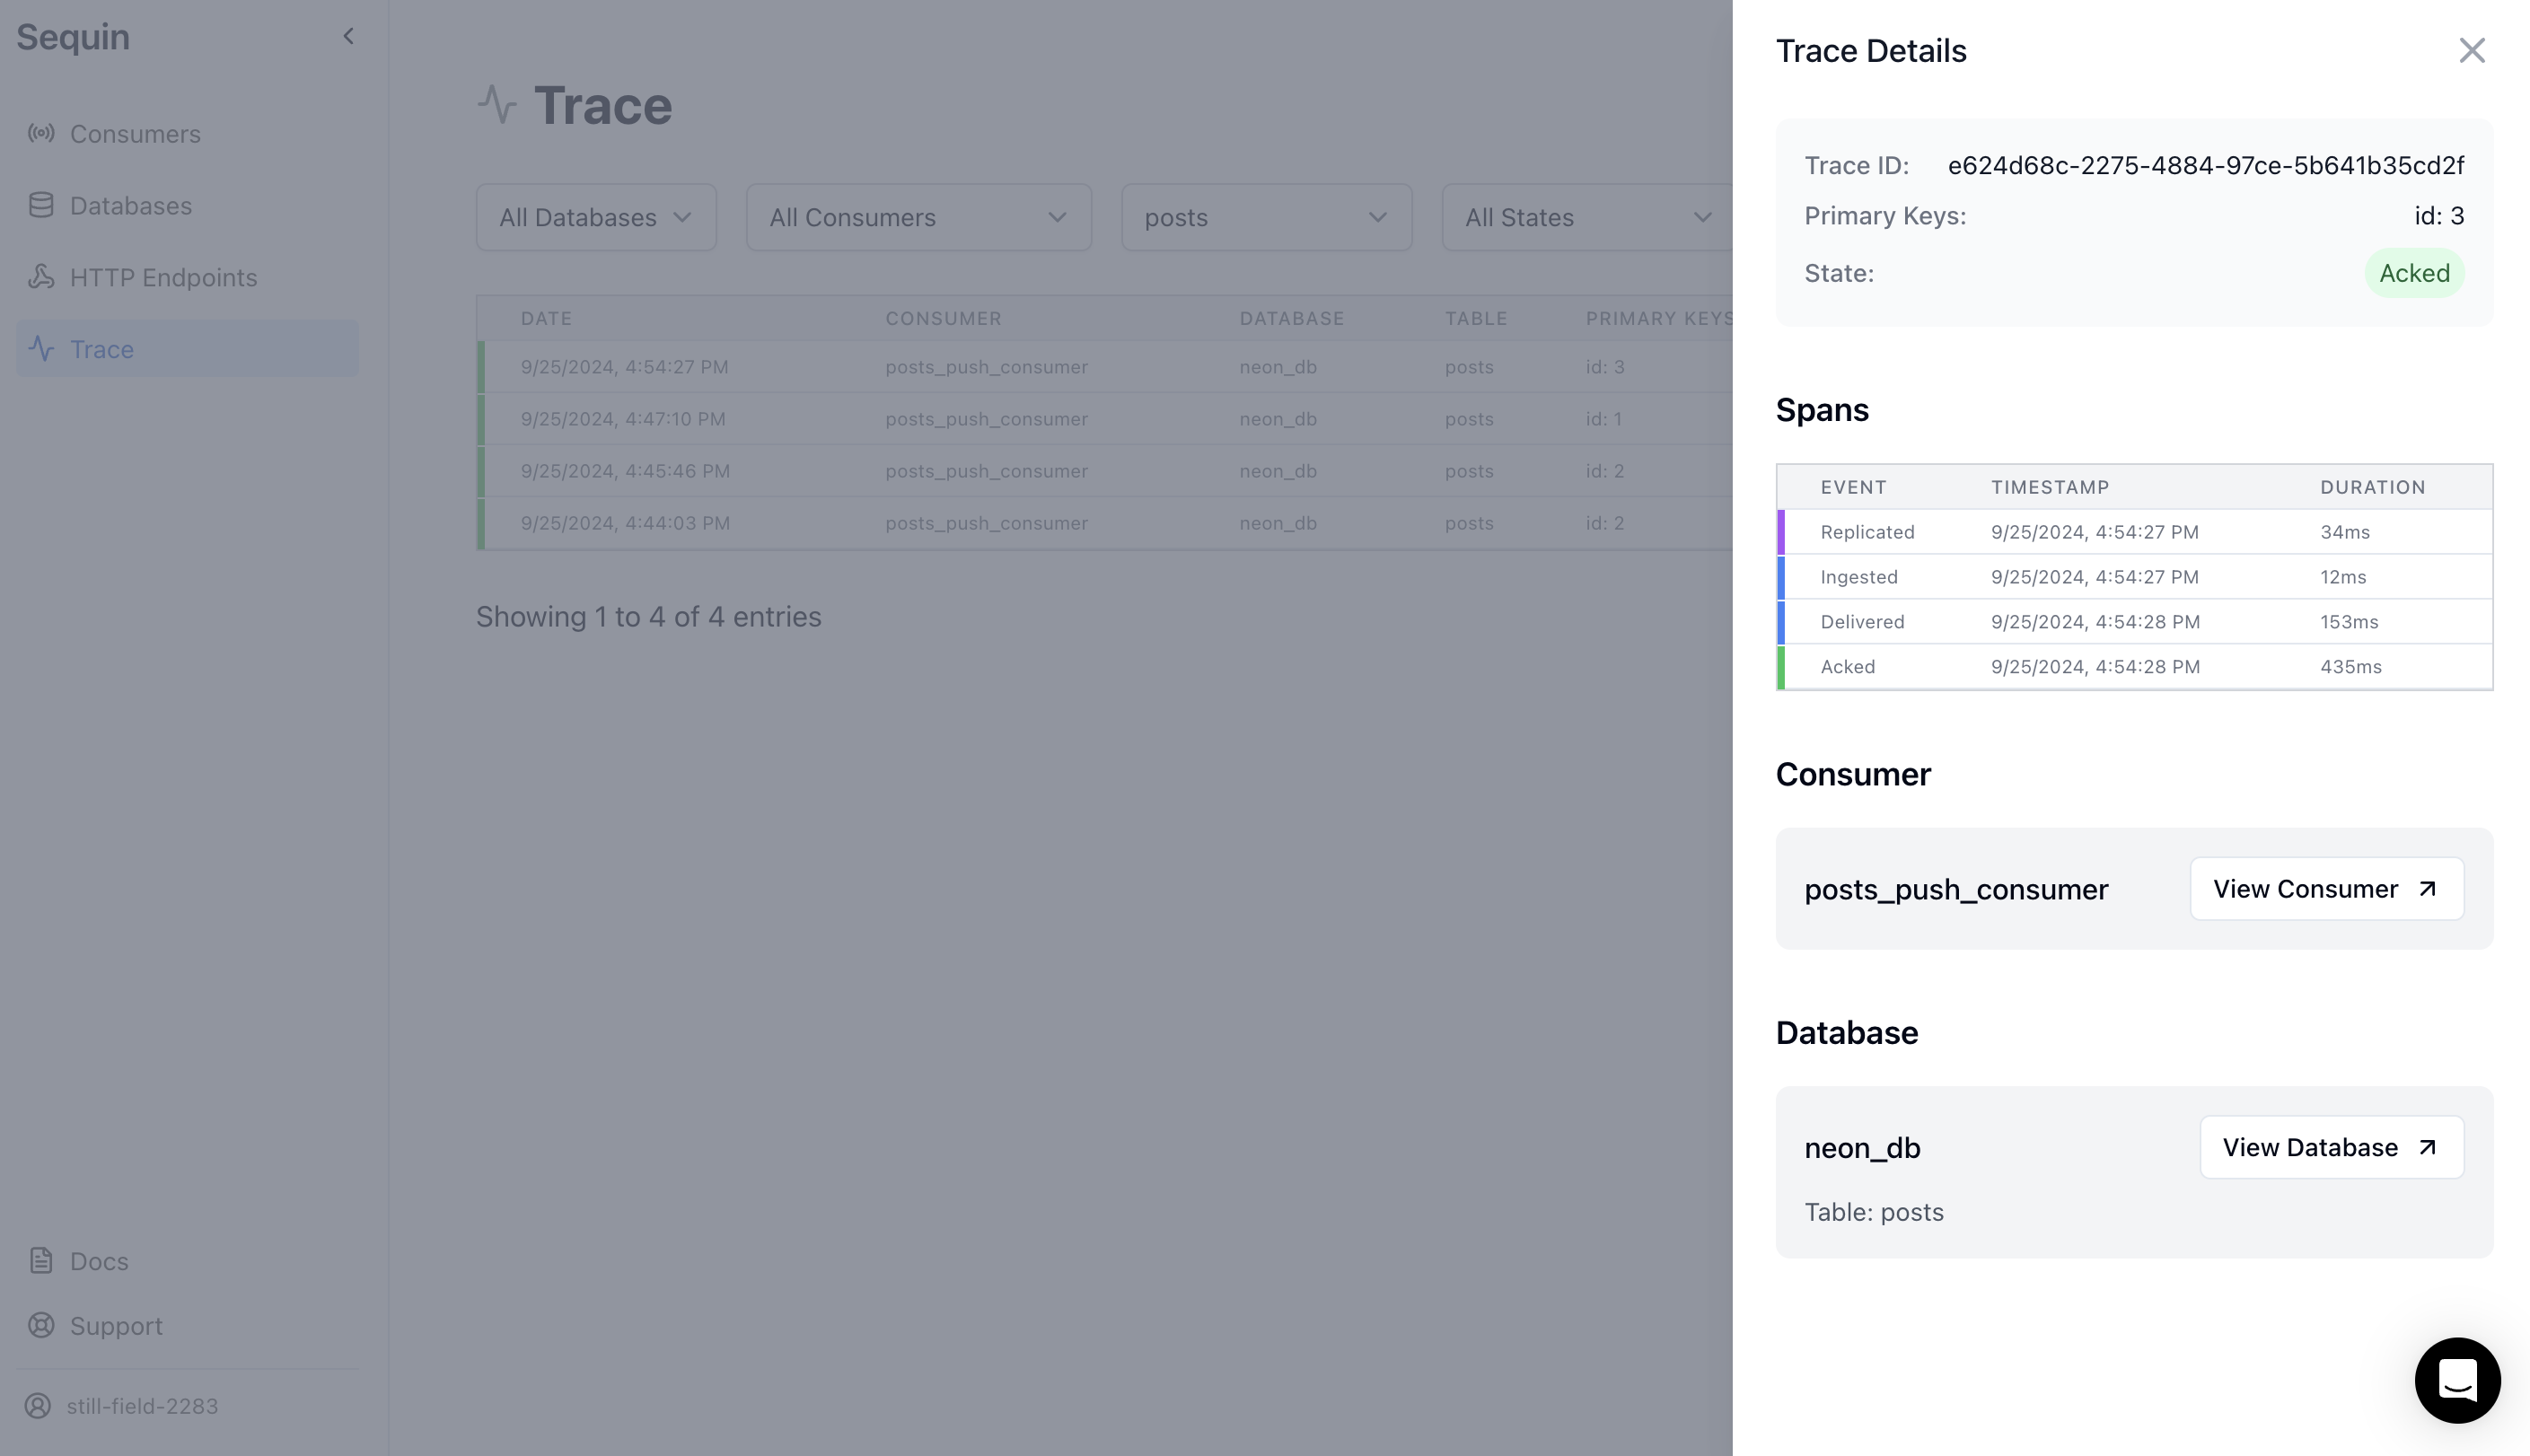
Confirm the event was received by your endpoint
In your local terminal, you should see a
200 response in your Next.js app:Observe the task run in the Trigger.dev dashboard
Finally, in the Trigger.dev dashboard, navigate to the Runs page and confirm that the task run completed successfully: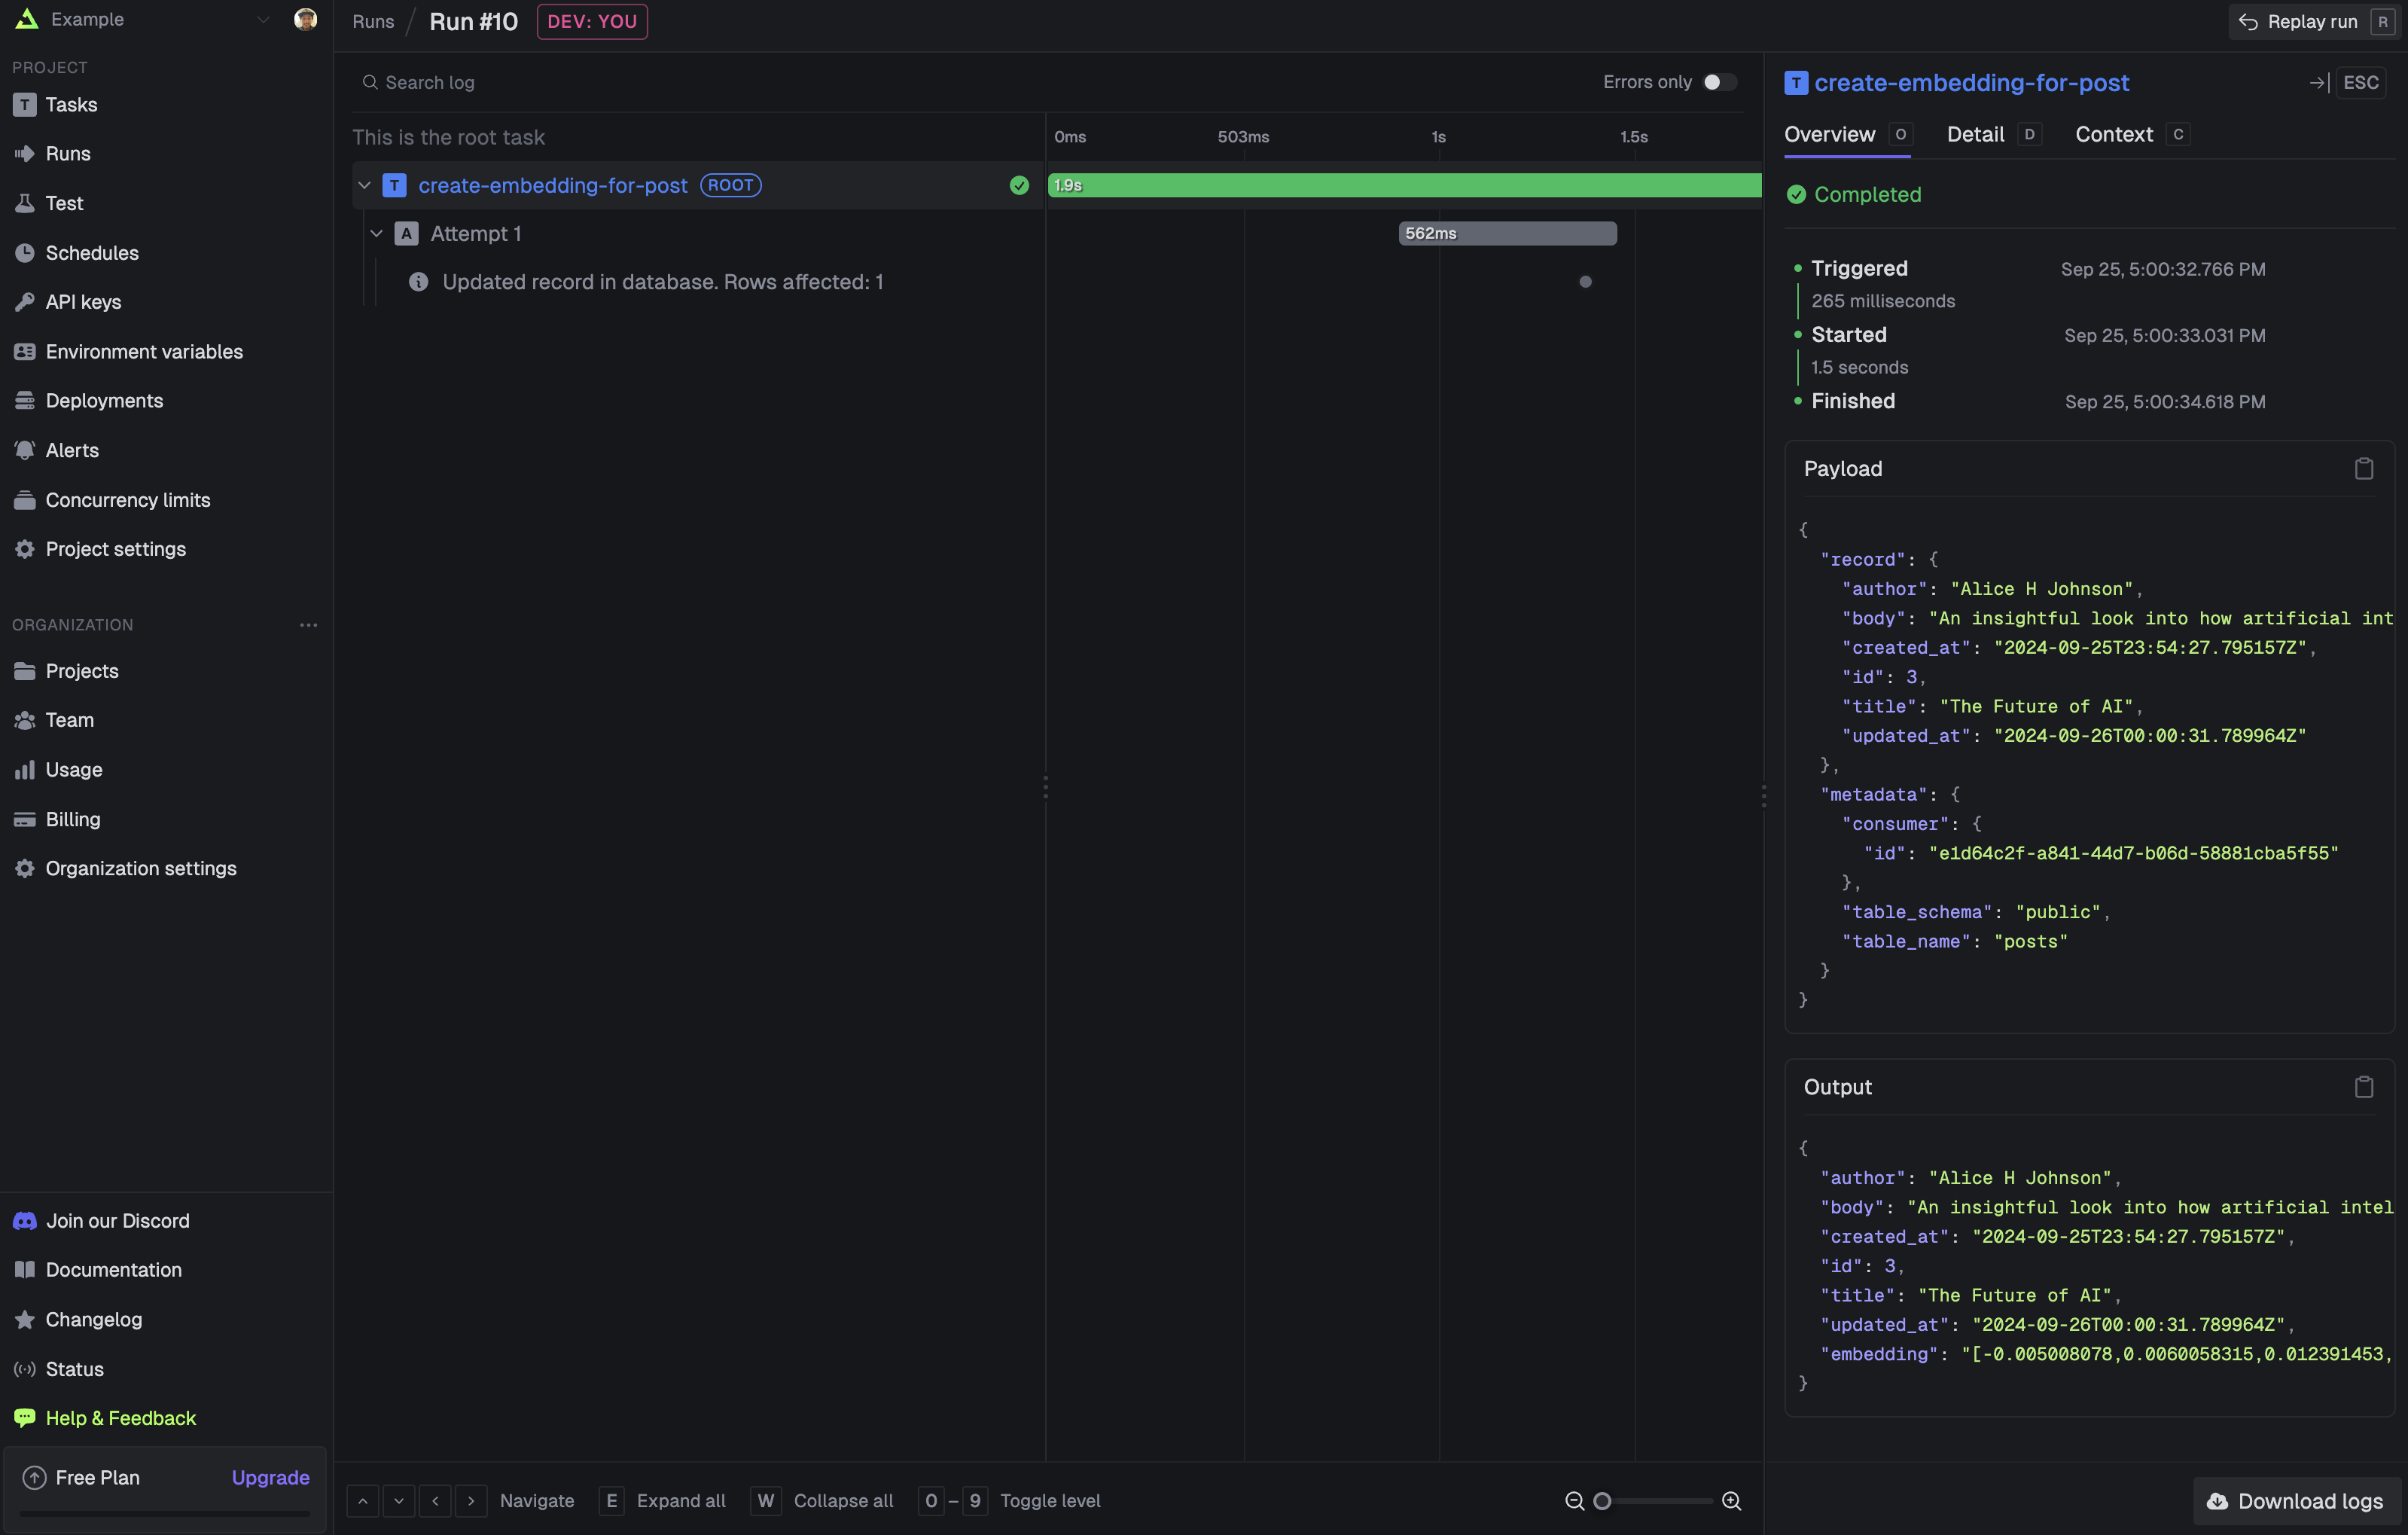
Every time a post is created or updated, Sequin will deliver the row payload to your API endpoint
and Trigger.dev will run the
create-embedding-for-post task.Next steps
With Sequin and Trigger.dev, every post in your database will now have an embedding. This is a simple example of how you can trigger long-running tasks on database changes. From here, add error handling and deploy to production:- Add retries to your Trigger.dev task to ensure that any errors are captured and logged.
- Deploy to production and update your Sequin consumer to point to your production database and endpoint.